Introducing CSS !
What are Stylesheets?
...then someone had a great idea, one file that defines all the values that those piles of tags would have done, and then have all your pages checking this file and formatting your pages accordingly. You can therefore leave out most of the formatting tags in HTML and use only nice structural elements (like headings, paragraphs and links) — separating structure and presentation." Ross Shannon
How CSS Works
Why Use Them? (aka CSS Benefits)
- Better formatting and layout control - CSS formatting and layout is much more powerful than tag based. Settings like backgrounds, spacing, layers and borders are not always available with HTML tags.
- Faster page downloads - sometimes by as much as 50%
- Less development and maintenance time - Less code to type, and your pages are shorter and neater (easier to read)
- Better accuracy/consistency throughout site - errors caused by editing multiple HTML pages occur far less often.
- Improves the accessibility of web content - separation of content and presentation allows for improved access for alternative devices (such as PDA's and screen readers)...ensuring that mobile device users and users with disabilities have the best access possible.
CSS Steps
- Mark up your document with structural tags like <p>, <div>, <h2> example file
- Write your formatting "rules." Like this h1 {color: purple;}
- Attach your rules to your marked up document.
Writing Rules
example
p {color: blue; font-family: sans-serif; }
- The selector is usually the name of a tag
- The brackets are {curvy}, not [square] or (round).
- After the property name there is a colon, and between each individual part there is a semicolon. Each of these pairs of properties and values is a declaration.
Exercise: My First Style Sheet
- Download and open this marked up document with its image.
- In the area indicated under the <style> tag, write rules that
- change the <h1> font to green
- makes the <p> font size small and the font face Verdana.
- Browse your document. Do you see the changes?
- Now update your css rules to do the following (try browsing after each change)
- change the h1 elements to red
- add a new rule that changes the h2 elements to red too
- add 100 px left margin to <p> elements using this declaration; margin-left: 100px;
- add 100 px left margin to the <h2> element as well
- add a red, 1-px border to the bottom of the <h1> element using this declaration;
- border-bottom: 1px solid red;
- float the image to the right and make the top and bottom margins 0 px and the right and left margins 12 px.
- img {float: right; margin: 0 12px; }
Attaching your Styles (3 ways)
- External Style Sheet- Use one CSS file for all your pages. This is the best way to do it!
- Embedded Style Block- Integrate CSS commands into the head of each of your documents.
- Inline Styling- Use the style attribute to put CSS code directly into a HTML element.
CSS allows you to use all three of these methods in glorious tandem, inheriting and overriding values as you go
External
<link rel="stylesheet" type="text/css" href="mystyles.css">
- rel stands for the file’s ‘RELationship’
- type is CSS stylesheet
- href is the absolute or relative path
Embedded - Style Block
<style type="text/css">
p {font-weight: normal; color: gray; }
h1 {color: black; }
</style>
Inline - using the Style attribute
<p style="color: blue; font-family: Arial; "> content </p>
Note: no curvy brackets used here; but the colon/semicolon rule still applies.
Exercise: My First External Style Sheet
- Cut and paste the code for your embedded style block to an external style sheet. Name it main.css.
- Don't forget your <link> tag in your twenties.html file.
- Try adding this inline style declaration <h2 style="color: purple">Connect the Dots</h2>
- What happened and why?
- Try changing the color of <h1> elements using an embedded style block
Hierarchy of Importance - the Cascade
The closer the styling is to the content; the more importance placed on the styling. So that the
General Order of Style Sheet Importance (least to most)
- external styles rules are given least importance
- embedded
- inline
Generally, styling starts with the external style sheet where all styling rules get passed down until they are overwritten by a style command closer to the source content.
So, what happens here?
<style type="text/css">
p {color: red; }
p {color: green; }
p {color: blue; }
</style>
Last one wins!
Overriding with !important
example
p {color: blue !important} would override
<p style="color:red">
Real Order of Style Sheet Importance (least to most)
- browser default
- user (custom) style settings - "reader style sheet"
- linked external
- imported external
- embedded style sheets
- inline style info
- any rule marked !important by author
- any rule marked !important by user
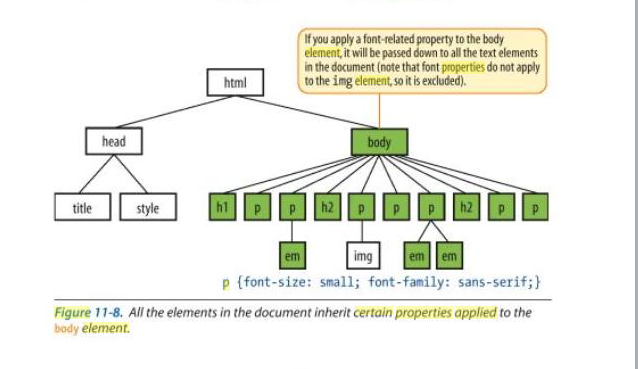
Inheritance - choosing the right selector
You can pass properties down via selectors!

image
from Learning Web Design by Jennifer Niederst ©2007 O'Reily Media
body {font-family: "Times New Roman"; color: blue; font-size: small; }
CSS for Layout too? Yes!
Exercise: Boxes, Boxes Everywhere!
- Add the following embedded style rule: h1, h2, p, em, img {border: 1px solid blue; }
- What happened?
- These "boxes" are what we will use to position or layout our stylistic elements.