CSS: The Box Model
All elements have boxes we can style and position!
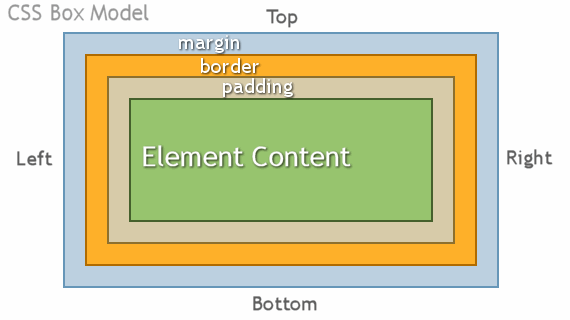
Parts of the Box

image by guistuff.com
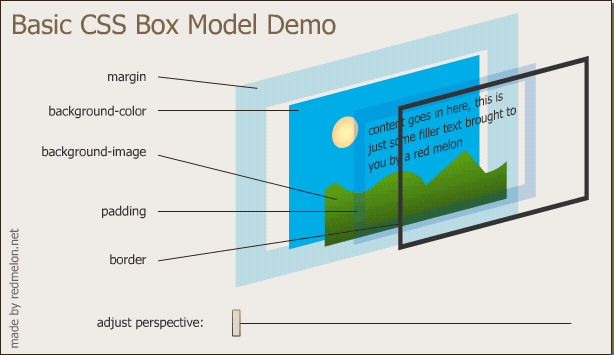
Cool interactive box model by redmelon.net

Box Dimensions
- Width and Height
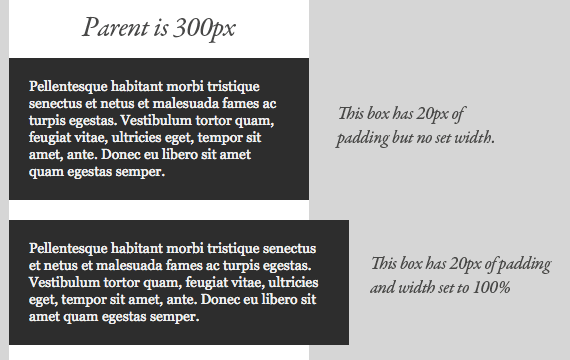
- applies only to element content area (except IE5 and earlier) padding, border and margins are extra!

- p#sub {width: 30%; height: 200px; background: #CCFF33; }
- options
- any measurement works; px, %, ems, etc.
- auto is default (full width of screen/parent element and as much height as necessary for content)
- Exercise 1: Box Dimensions
- Download and open our file from last week, now called borders.html.
- Max and Min dimenions
- p#sub {min-width: 30%; min-height: 200px; }
- great for dynamic content
- not supported by IE 6 and earlier
- options
- max-height
- max-width
- min-height
- min-width
- Overflow
- p#sub {width: 30%; min-height: 200px; max-height: 500px; overflow: scroll}
- options
- visible - (default) extra content flows outside box
- hidden - extra content hides (no scroll appears)
- scroll - scrollbars appear
- auto ** horizontal scroll only **
- Exercise 2: Overflow
- Set your cust_quote class to a width of 200px and height of 100px.
- Try the different overflow options. Which do you prefer?
Padding
- area around the content - allows one to see bgcolor and border of element
- blockquote { padding-top: 1em; padding-right: 3em; padding-bottom: 1em; padding-left: 3em; }
- options
- padding-top
- padding-right
- padding-bottom
- padding-left
- shorthand
examples
(clockwise)
- blockquote { padding: 1em 3em 1em 3em; } all sides or
- blockquote { padding: 1em 3em; } top/bottom right/left or
- blockquote { padding: 1em 3em 1em; } top right bottom
- Exercise 3: Padding *
- Download this folder to your desktop and open jenware.html in DW.
- Notice the three div sections in the document.
- Add 2 ems of padding all around for the products div.
- Use shorthand rule to add 1 em padding all around testimonials.
- Now try overriding left padding to 60px.
Borders
- Border-style
- must be declared to create a border, otherwise other border settings are ignored
- #testimonials {border-style: dotted; }
- other properties
- border-top-style
- border-right-style
- border-bottom-style
- border-left-style
- shorthand
- #testimonials {border-style: solid dotted dashed double; }
- Exercise 4: Border-style
- Using border.html change the border style of your customer quotes.
| none | solid | double |
| dotted | dashed | groove |
| ridge | inset | outset |
- Border-width
- #testimonials {border-width: thick; }
- values
- px (most common)
- thin
- medium (default)
- thick
- other properties
- border-top-width
- border-right-width
- border-bottom-width
- border-left-width
- shorthand
- #testimonials {border-width: thin; } or
- #testimonials {border-width: thin medium thick 12px; }
- Exercise 5: Border-width
- Try changing your border widths.
- Border-color
- #testimonials {border-color: navy; }
- values
- keywords
- hex values
- other properties
- border-top-color
- border-right-color
- border-bottom-color
- border-left-width
- shorthand
- #testimonials {border-color: navy; } or
- #testimonials {border-color: navy lime; }
- Exercise 6: Border-color
- Now try changing your border colors.
- Try giving the new_quote id a different border color.
- Border shorthand - Style, Width and Color
- format { border: border-style border-width border-color; }
- example p.example { border: dotted thick orange; }
- Exercise 7: Border shorthand
- Try consolidating some of your rules using a shorthand border rule.
Margins
- space between border and exterior content
- examples
- h2 { margin: 2em 4em; } (t/b, l/r)
- h2 { margin: 15px; }
- h2 { margin: 15px 3em 3%; }
- h2 { margin: 15px; margin-left: 25px; }
- values
- px
- %
- em
- auto (used to center items horizontally)
- other properties
- margin-top
- margin-right
- margin-bottom
- margin-left
- caveats
- collapsing margins
- not the sum of all adjacent margins
- only largest margin valus is used
- inline text elements show only horizontal margins (no vertical)
.margin_ex {
margin: 10px;
padding: 3px;
border: dashed;
border-width:thin;
border-color:#FF6600;
}
- collapsing margins
- Exercise 8: Border Wrap-up
- Try manipulating the padding and bottom border your navbar links.
- Try changing the background color or bottom border on hover.
- Exercise 9: Border Tricks
- Using jenware.html
- use the shorthand border property to add this orange #F26521 to the testimonials div.
- add a double border around the products area with a light orange (#FFBC53) color
- for product h2's, make the
- top border 1 px solid
- left border 3 px solid
- and left padding 1 em
- set text-decoration to none and use a complimentary bottom border to identify your links.
- Exercise 10: Margins
- add 12% right and left margins to the jenware.html doc.
- add a 3em margin on the intro div on top and bottom, 0 margin for right/left.
- make the width of the testimonials 500px.
- use the auto margin value to center the testimonials on the page, add a 2em top/bottom margin.
- add a top margin of 3ems to the product h2's.
Positioning Boxes
Normal Flow
- Block elements are layed out according to their order in the source code
- If no width is defined, the block will fill the screen or parent element.
Floating
- "moves element as far to that side as possible"
- Allows for text to "float up" beside the floated element
- Example img {float: right; }
- Values
- left
- right
- none (default)
- Single element
- goes to the side and allows subsequent text to float up beside floated element
- Multiple elements
- will stack up in order the appear in code until no horizontal room is left
- Exercise 10: Floating
- Try floating your customer quotes to the right.
- Try just floating the new_quote.
- Did they behave as predicted?
- Clear
- disallows an element from wrapping
- example h2 {clear: left; } will start below any element floated left
- values
- left
- right
- none
- both
- Exercise 11: Floating with Jens Kitchen
- Using jenware.html, float your product images left and add 6 px of padding to the bottom and right sides (zero on others)
- Add a 250px right margin on your products div to visually seperate the testimonial from products divisions